- How to set up a TP-link extender WPS?
If you having issues to set up a Wi-Fi extender via WPS. So, here we provide a solution for this step by step. TP-Link extender setup using WPS (Wi-Fi protected setup) method. TP-Link’s Wi-Fi Range Extenders help in abolishing the dead zone areas from home/office by build-up wireless signals and enlarging networks up to 10000 square feet.
The TP-Link extender setup simply needs to be set up incorrectly way in order to boost the range of your router using WPS. A very hassle-free method for all because it is a very short-timed and simple method.
Follow the below steps to set up the TP-Link repeater with the WPS button:
1. Firstly make sure to turn on and place your TP-Link Wi-Fi extender closer to your existing router.
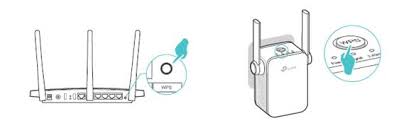
2. Then press and hold the WPS button on the TP-Link extender.
3. Meanwhile at the same time within 2 minutes press and hold the WPS button on the router also.
4. Wait till the device gets connected, In case still having an issue then click http://tplinkrepeater.net.
5. Once done then LEDWi-Fi turns to solid on the TP-Link extender.
6. Now just simply connect to your extender network using the default username and password.
7. Finally, the TP-Link extender setup is successfully set up.


